Sampling and Isolation
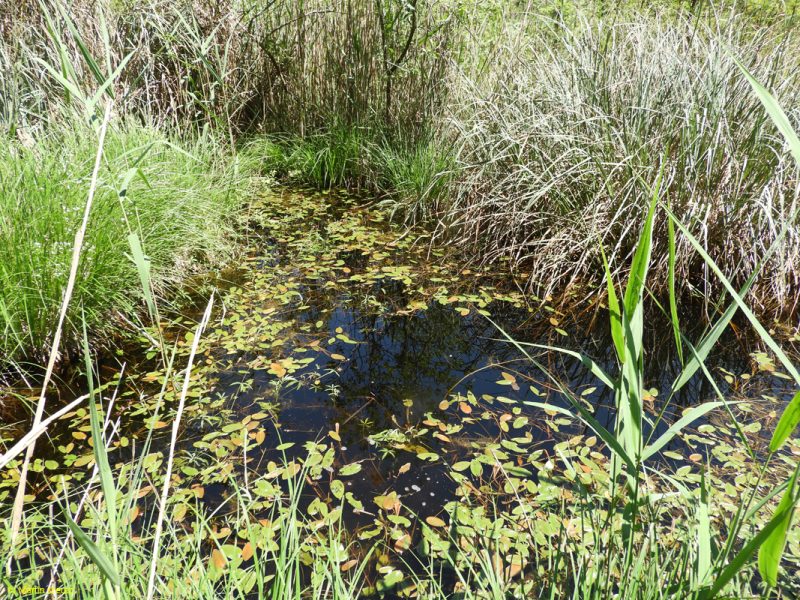
Practically all microscopic protozoa and metazoans are bound to water as a habitat. Even though many species can survive dryness and heat as cysts, the active life phase takes place in water. Therefore, the typical starting points for microscopists with this area of interest are ponds (s. fig. 1), small lakes, bogs (s. fig. 2) and puddles.
Fig. 1: A pond suitable for plankton sampling.
Fig. 2: A brown water pond with a thick layer of organic sludge.
Most protozoa and metazoa are found either in the pelagic zone (plankton), as growth on plants or stones, and in the mud on the bottom of bodies of water. The organisms in the plankton and in the growth are very easy to collect and isolate. It is somewhat more elaborate to collect the organisms in the mud and then isolate them from this matrix. However, the effort is worthwhile, because at the bottom of the waters dead plants are decomposed and form a food base for bacteria and ultimately also many interesting protozoa and metazoa.
Here I would like to describe how I collect my samples and which isolation techniques have proven themselves.
1. Sampling
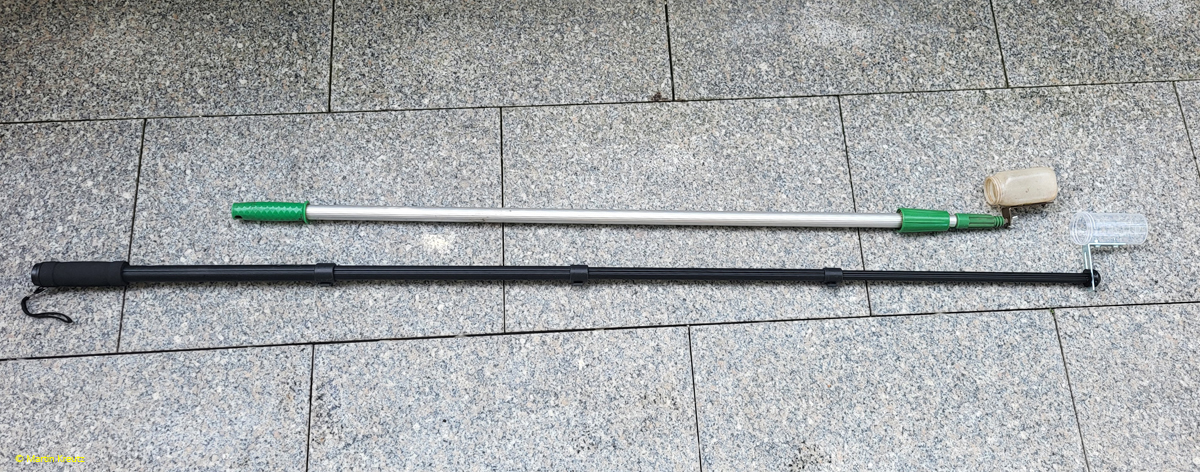
For sampling I use two telescope poles, onto which I can alternately screw a sample cup or a plankton net (s. fig. 3). The longer pole (extendable to about 3 m) is from the hardware store and is otherwise used for cleaning windows or for painting. The second, black rod is an extendable monopod for photography (extendable to approx. 2 m), which I ordered online. This monopod has the advantage that, when collapsed, it fits into a backpack.
Fig. 3: The two telescope poles I use to collect samples.
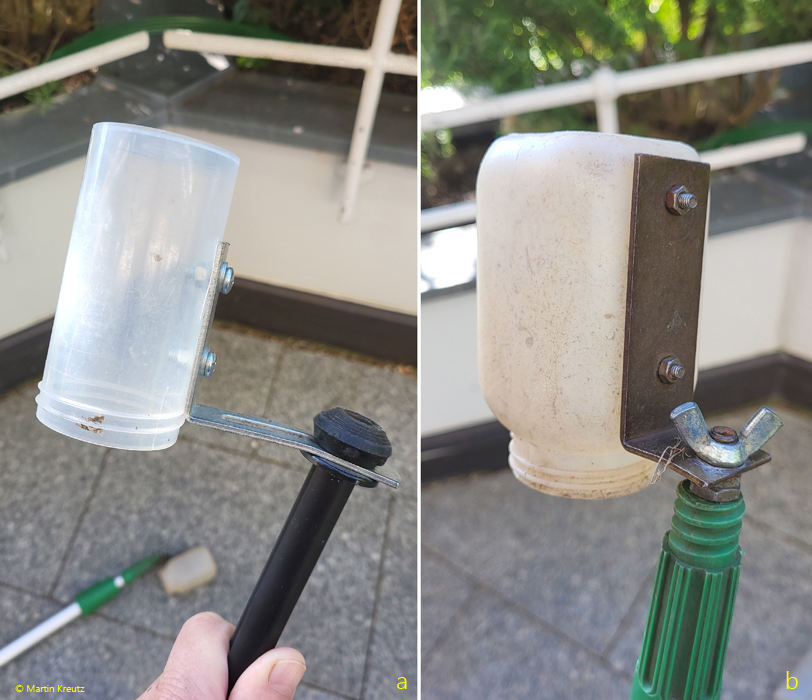
Both poles have an M8 thread (~5/16″) at the end. These threads are very practical because I can screw my sample cups and my plankton net onto them. To screw on the sample cups, I have fitted them with an angle iron. I then attach the angle irons to the rods with an M8 wing screw so that I can loosen them on the go without pliers (s. fig. 4).
Fig. 4: The sample cups attached with the angle iron to the M8 threads of the telescop poles.
1.1 Plankton sampling
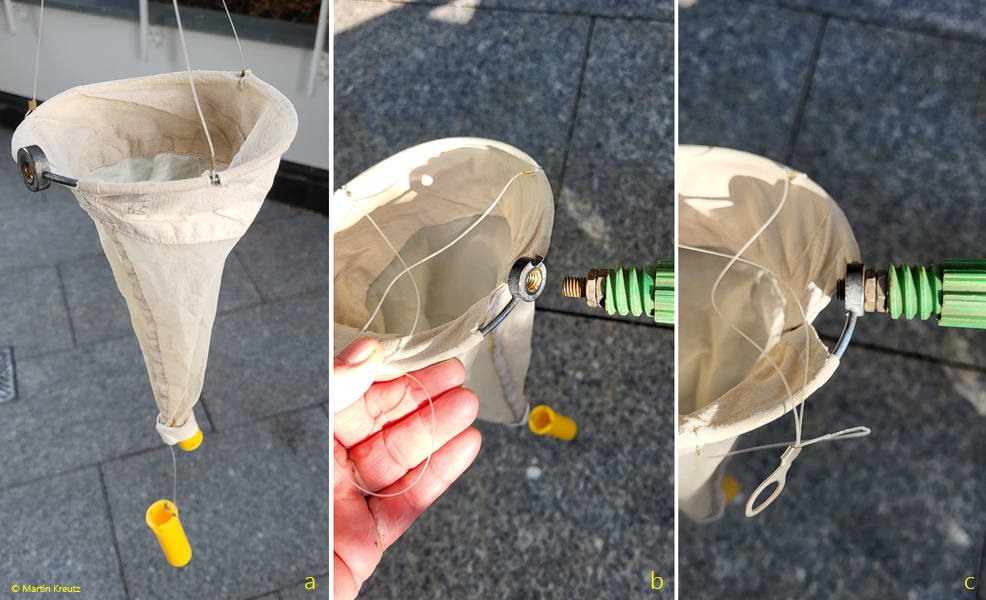
For this I use a plankton net with a mesh size of 65 µm. I bought it in 1982 and despite its many uses it works perfectly and has no holes. A major advantage of this plankton net is that it also has an M8 thread. This allows me to screw it onto my two samplers. This makes it easier to handle when fishing for plankton, and loss due to loosened knots is impossible. Although I only own this plankton net, I still find organisms significantly smaller than 65 µm in my plankton samples. Since I do not carry out quantitative analyses of plankton populations, this mesh size is absolutely sufficient for me, even though only a smaller proportion of the smaller organisms is caught than is actually present. All of the plankton organisms shown on my website were collected with this plankton net.
Fig. 5 a-c: The 65 µm plankton net can the attached to the telescope pole with the M8 thread.
1.2 Immersed slides
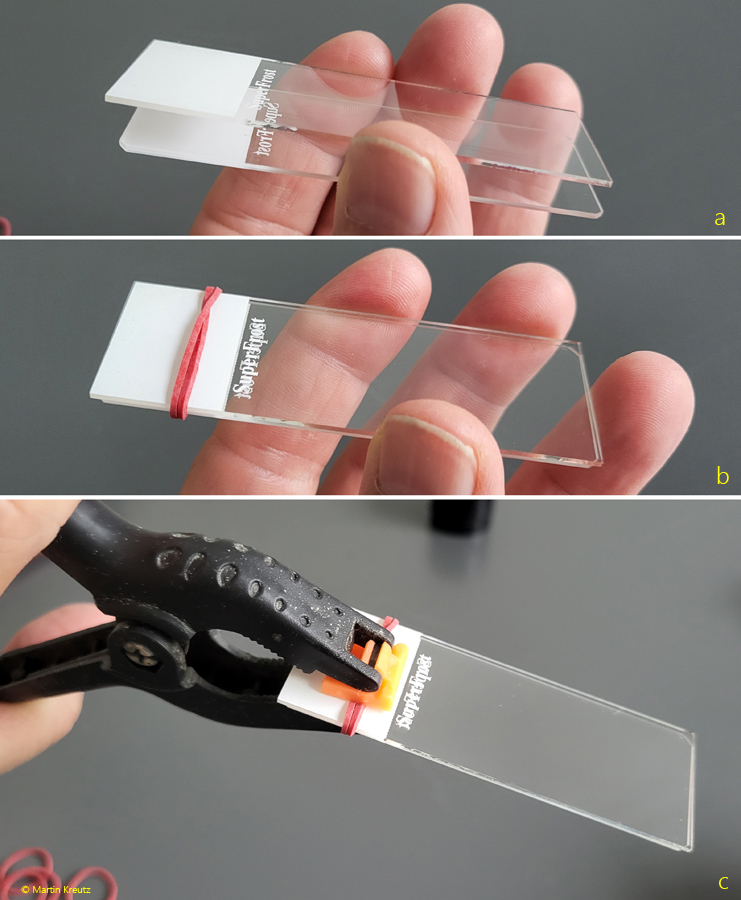
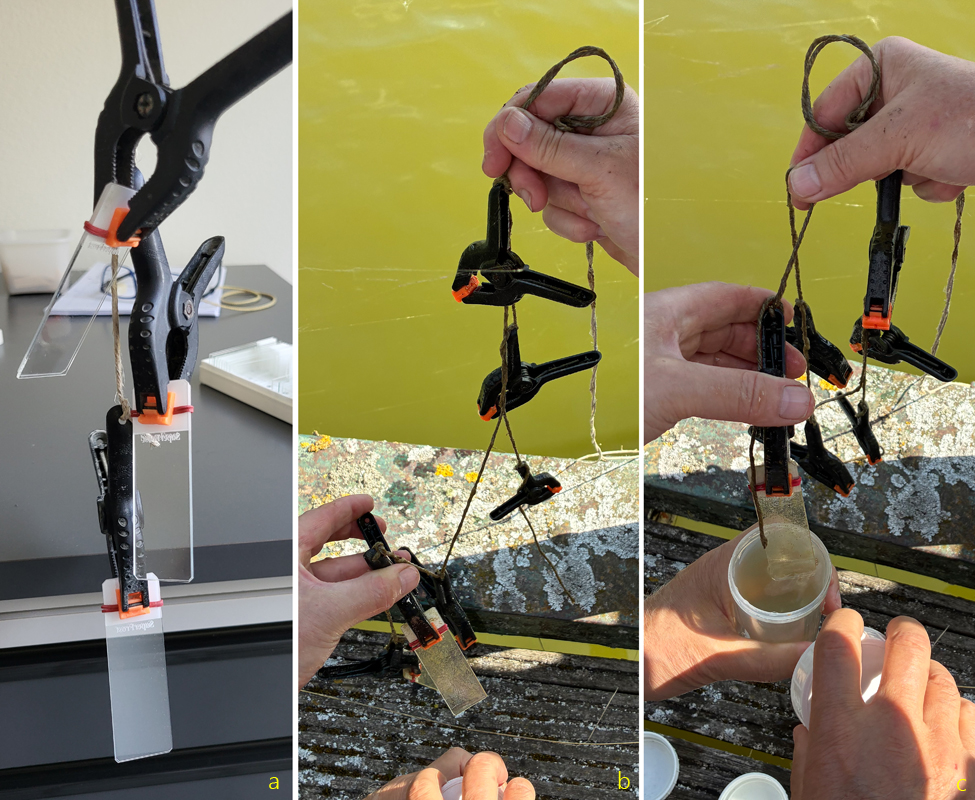
If the discovery area is a larger body of water, you can work with immersed slides on which, in particular, sessile organisms can settle. To do this, I first connect two slides with a rubber band so that they are provisionally fixed. Then I attach the double slides with a clamp that is available as craft supplies in online stores. With a string I then link 3–4 clamps, each with one double slide. I then hang this chain in a suitable place in the water, and the immersion depth can be varied. I usually choose an immersion depth of 50–100 cm. How quickly the slides are colonized depends on the type of water body and the season. In my experience, colonization in eutrophic waters in summer occurs after just two days. It should not become too dense, so that later the organisms do not overlap under the cover glass. After taking out the slides, they can be transported in containers filled with water from the site. After separating the slides, you have one uncolonized side and the colonized side for examination. If you cannot examine all slides immediately, it is advisable to store the cups with the slides in the refrigerator.
Fig. 6 a-c: Preparation of immersed slides.
Fig. 6 a-c: The prepared slides before (a) and after (b, c) being suspended in a pond for three days.
1.3 Organic sludge
The bottom of a body of water can be of very different nature. It can simply consist of gravel, sand or clay. This type of water body is not very rich in species and not a good place for microscopists to collect samples. In contrast, promising bodies of water are those that are rich in aquatic plants and/or surrounded by trees, so that in autumn a thick layer of leaves accumulates on the bottom. In these waters, a thick layer of organic mud can form over the years, which can be very species-rich. Therefore, I mainly examine samples from such organic mud layers.
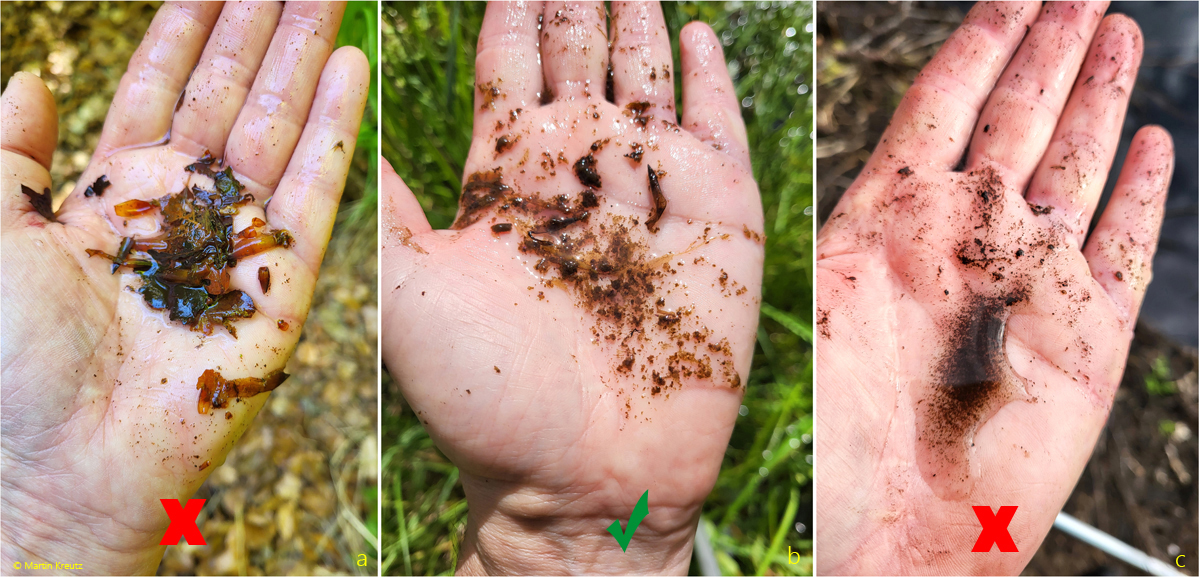
There are several things to consider when taking samples from such organic sludge layers. If it is an undisturbed body of water, then the organic sludge layer is clearly stratified. New dead plants and leaves continually sink down from above. Bacteria, insect larvae, and snails begin the fragmentation and decomposition. As decomposition increases, the number of bacteria rises, and bacteria-eating protozoa and metazoans appear, and eventually their predators as well. If decomposition continues further, which can take years, the plant material becomes increasingly poor in nutrients and is eventually mineralized. These layers are found at greater depth.
This process of progressive metabolization can also be recognized visually. The uppermost centimeters of the organic sludge layer are formed by plant material that has settled relatively lightly, which has only broken down into coarse pieces or has been fragmented. Beneath it lies the most interesting layer, in which the material becomes flocculent. It is the zone of strongest metabolization. Below that, the material becomes increasingly fine and homogeneous.
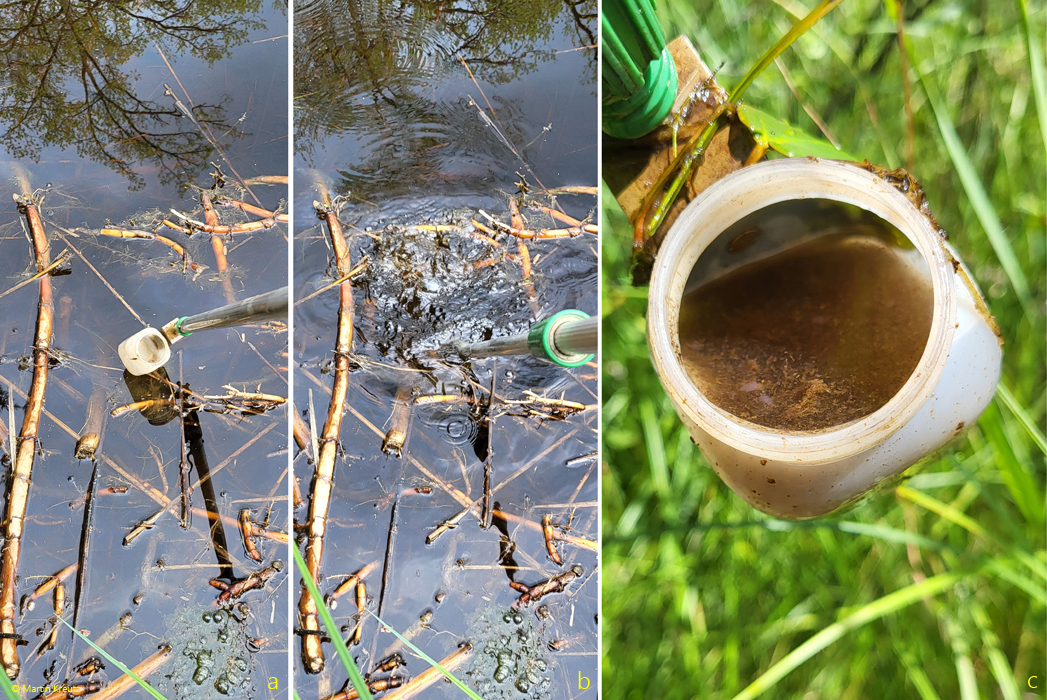
Since one does not know exactly where the flocculent metabolization zone is located, several test samples must be taken. For this I screw a sample cup onto the sampler and push it fairly quickly through the water column into the sludge layer. Only there does the sample cup fill up and become filled with the sludge. I assess this by its appearance. If it is flocculent, I take further samples from this depth. Otherwise I take further test samples until I hit the metabolization zone. Nevertheless, one must expect that only 1–2 samples out of 10 contain a strong population of protozoa and metazoa.
As sample containers I mostly use those made of polypropylene. This way I avoid glass breakage during collection and save weight. I use cups of 150 and 400 ml as well as 500 ml conical-bottom containers (centrifuge cups). The conical-bottom containers are particularly suitable for concentrating anaerobic or facultatively anaerobic organisms. These always move downward in the sludge layer and finally accumulate in the tip of the container, where they become concentrated.
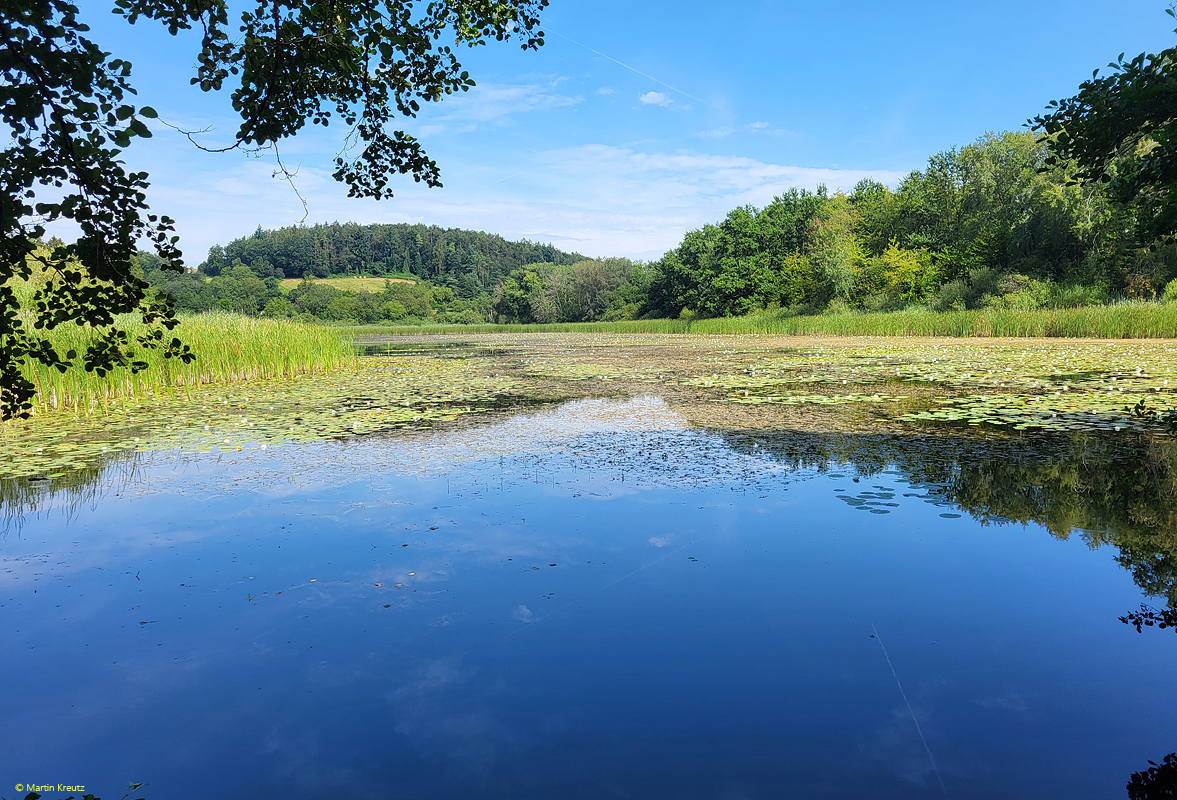
Fig. 7 a-c: Organic sludge from various depths. Decomposition is not far advanced in the uppermost layer (a). Next comes the layer containing flocculent material, where the most intense metabolization occurs (b). At greater depths, one finds only highly decomposed, nutrient-poor particles (c).
Fig. 8 a-c: To get a sample of the organic sludge the sample cup has to push fairly quick through the water column into the sludge layer (a, b). Then the sample cup is filled with the sludge (c).
2. Isolation
When fishing for plankton or hanging in slides, further preparation of the samples is not necessary. You can immediately place a drop of the sample under the cover glass, or you put it onto the hanging slide with the organisms grown on it. However, if you want to examine the organic sludge, you must prepare it in order to be able to study the organisms it contains. In the following, I describe the techniques that I most frequently use for this purpose.
2.1 Floating coverslip
I have already presented this very simple and efficient method here:
It works not only with sludge, but also with chopped aquatic plants, wood, moss, or grass. However, not all organisms in the samples settle on the cover slip. This should always be taken into account when using this method.
2.2 Use of a cell strainer
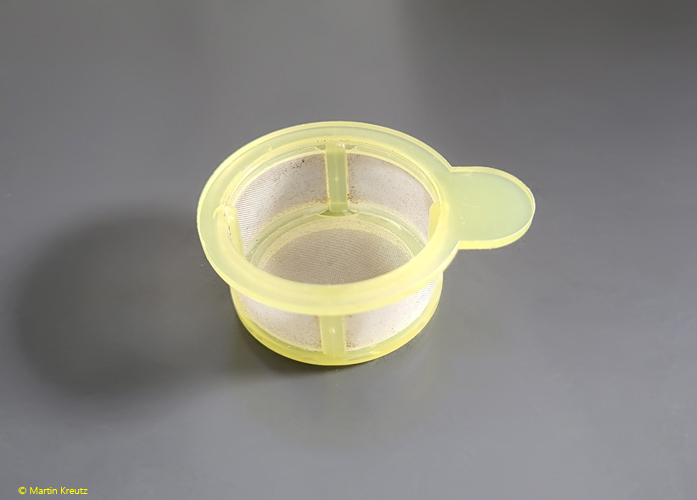
For this method I use commercially available cell strainers that can be ordered online. They are available with different mesh sizes. I use those with a mesh size of 100 µm. This allows the organisms in the sludge to be isolated very quickly. However, sensitive organisms do not survive passage through the mesh, or they are injured and deformed. This should be taken into account with this method.
Fig. 9: A standard cell strainer with a mesh size of 100 µm.
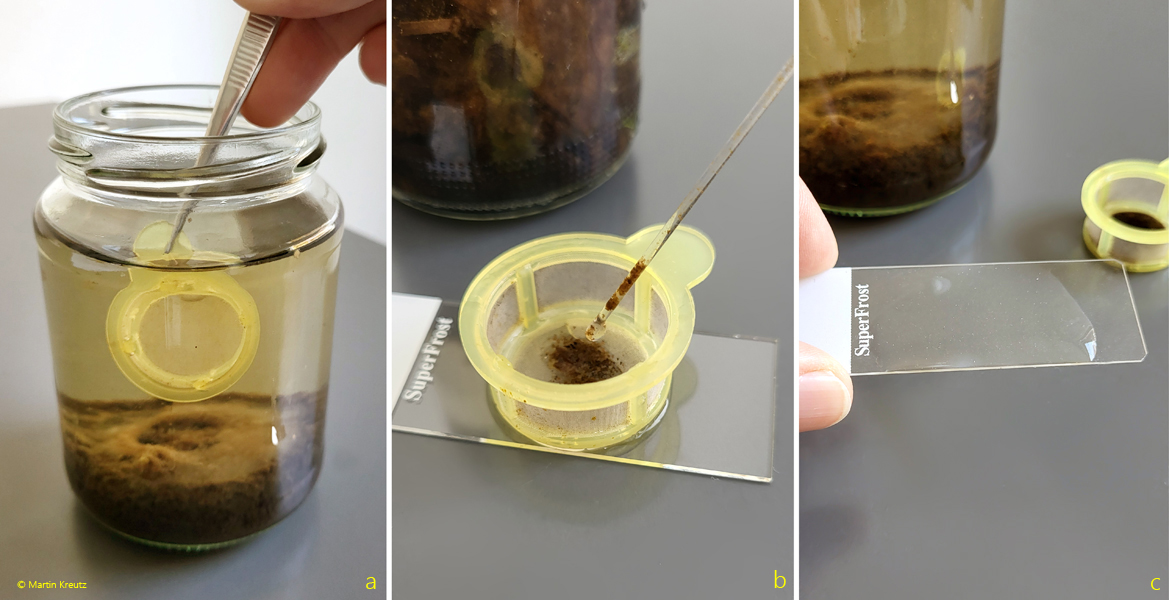
I briefly dip the cell strainer into the sample before filtration to moisten it. Otherwise it is too hydrophobic and the filtration works poorly. Then I place the wet cell strainer on a slide and add about 1–2 ml of the sludge. After lifting off the cell strainer, you have the filtered sample, which can be examined immediately.
Fig. 10 a-b: Once wetted in the sample (a), the cell strainer becomes hydrophilic and allows water to pass through unimpeded (b). The sludge particles are retained (c).
2.3 Contact method
This method of preparing a sludge sample is not only very simple and fast, but also has the advantage that very sensitive organisms with high coverslip sensitivity (e.g. Metopus) can be examined with it.
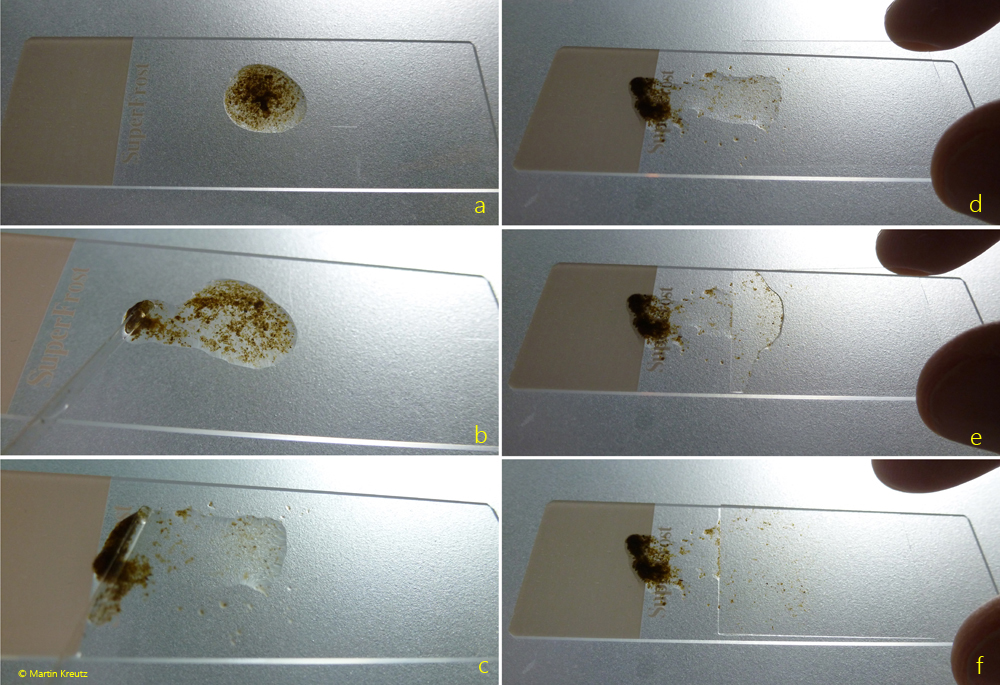
You place about half a milliliter of sample on one side of a slide. Not in the center. Then you begin to push the sludge particles to the edge of the slide using a pipette or a tweezer. This is achieved through repeated wiping movements. Gradually, most of the sludge is removed from the drop, but smaller particles remain, which is desired. A coverslip is now brought into contact with the edge of the drop (s. fig. 11 e). Immediately the water, including remaining particles, begins to flow under the coverslip. The larger the particles are, the sooner they get stuck. As a result, the coverslip lies in a wedge shape (s. fig. 11 f). On the side facing the drop the layer thickness is greatest, and on the other side the sample is practically particle-free and has only a very small layer thickness. With a bit of luck, organisms have also been washed under the coverslip and “got stuck” where the layer thickness became too thin for them. It is somewhat a matter of luck, but because the samples can be prepared quickly, it is often successful.
Fig. 11 a-f: The sludge particles are removed mainly from the droplet by wiping movements with a pipette or a tweezer (a-c). A coverslip is now brought into contact with the edge of the roughly cleaned drop (d-f).
2.3 Slide method
I use this method most often, as it is the gentlest for organisms living in the sludge and yields a comparatively large amount of cleaned sample. However, it does require some practice.
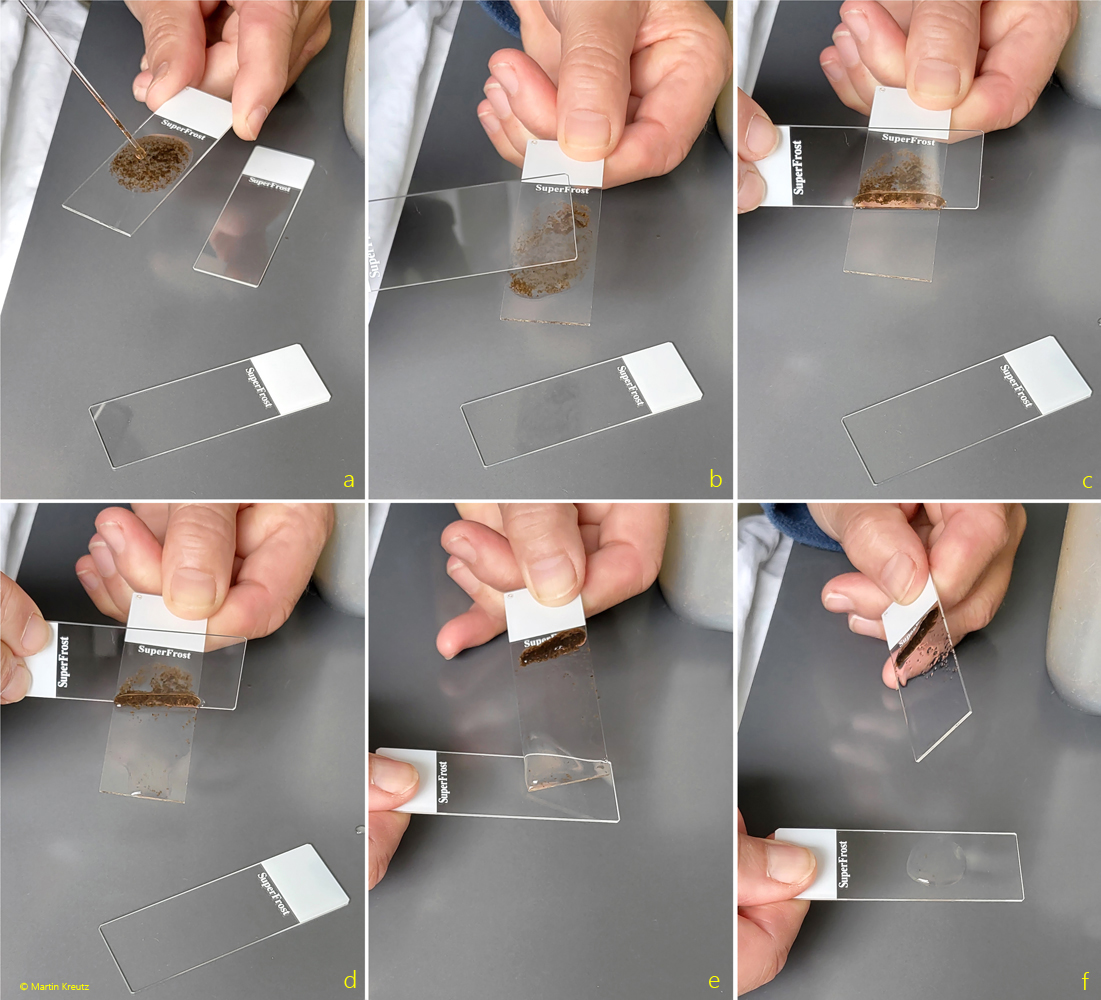
For this method I first clean three slides with glass cleaner, as they are often hydrophobic when taken out of the package. I place about 3–4 milliliters of the sludge sample on the first slide. With a second slide I then push the sludge to one side, holding the first slide at a slight angle. At the same time, I tilt the “pusher” slide slightly in a wedge shape so that water (and organisms) can drain off from the sludge while the particles are retained. At the same time I continue pushing the sludge upwards while the water runs downwards and collects there. If some sludge does get under the pusher, you can reposition the pusher and repeat the movement. The cleaned water collects at the lower end of the slide, while the sludge remains stuck at the other end. You can then pour the cleaned sample onto a third slide, into its center.
Even very sensitive organisms survive this isolation method. It is also suitable for sludge samples with small populations of organisms, as you obtain quite a large amount of sample that you can examine.
Fig. 12 a-f: The particles of the sludge are pushed with a second slide to one side while the water is flow to the other side (b-e). The pusher slide has to be slightly tilted during movement to allow the water to pass. Finally, the cleaned sample can the transferred into the center of a third slide (f).
2.4 Baermann method (modified by Müller)
The Baermann method is actually a method for isolating nematodes from soil samples. The method was modified by Müller (2019) for the isolation of protozoa and metazoa from aquatic sludge samples. It is somewhat more laborious, but it delivers very clean, almost particle-free samples.
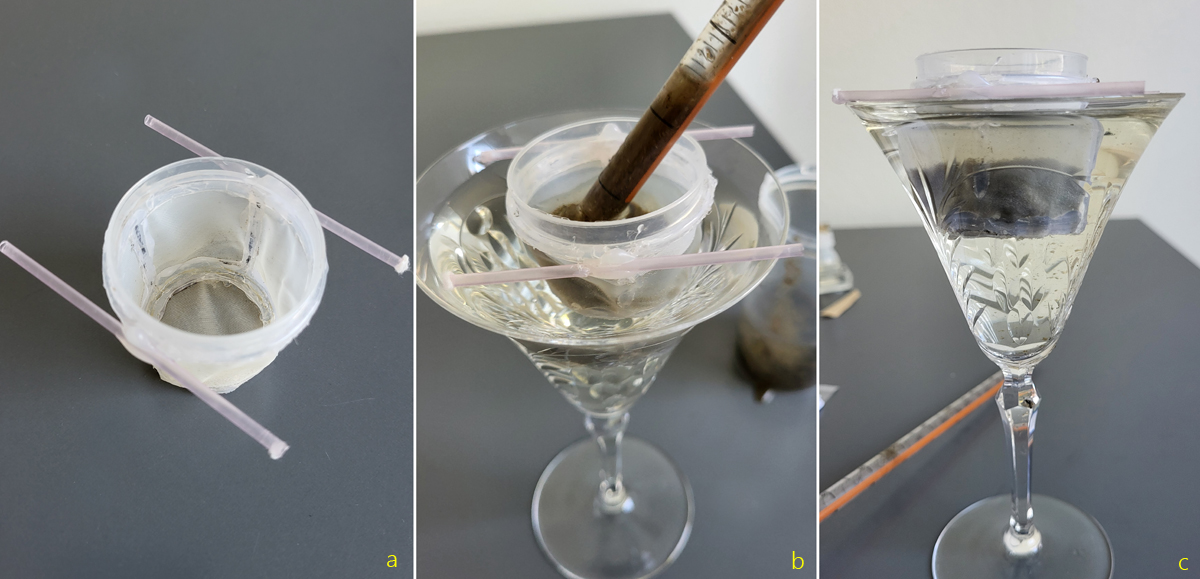
To carry it out, you need a conical vessel. I use a martini glass for this, which has the appropriate volume and opening width. This is filled to about 80% with clear water from the collection site. Then a sieve with a mesh size of about 100 µm is suspended in it. I use a self-made sieve of filter fabric from an online vendor with a mesh size of 100 µm. After being suspended, the sieve fills with water. Only then is the sludge sample placed into the filter. You should make sure not to overfill the sieve. Over the next 1–2 hours, all mobile organisms in the sample migrate downward, pass through the sieve, and finally accumulate in the conical bottom of the glass. The organisms can be easily pipetted off there. The method works very well, even for sensitive organisms.
Fig. 13 a-c: A sieve with about 100 µm mesh (a) is immerged into the water collected from the collection site (b). Now the sludge is carefully filled into the sieve. After 1–2 hours, the organisms from the sludge collect at the conical bottom of the glass.